Monday, February 28, 2011

March "Welcome Spring!" Table

On the day after a foot of fresh snow fell, I set my March Welcome Spring table anyway! With Easter so late in April this year, I decided it's still Springtime, even though in Utah, we'll enjoy snow through May. So, I let my table says spring anyway!
I used three of my little Hummel figurines that were bearing flowers as gifts. We're so ready for flowers!
Not being much of a St. Patty's Day gal, I still wanted to use lots of green for the table. The green vase with soft green flowers, green dishes and sage green napkins all came together well for not being even closely related.


This, being a spring tablescape, didn't need lots of candlelight, so I opted for an ivy garland woven with a garland of twig patio lights just to give it some pop!

I love this garland with the dew drops on the leaves!

No placemats, just a simple doily across the table.

This is the first tablescape that I've created, in which, I've loved the daytime photos better than the nighttime candlelit shots. The morning sun shining and reflecting off the foot of snow in the front yard was perfect!


Even with all that snow, this table screams "SPRING!!"

I really want to open the windows!

For years, I've kept my Hummels stored in the Curio cabinet, but tablescaping has given me an opportunity to take them out and enjoy them even more! LOVE IT!

It may not bring spring any sooner, but it was my own way of welcoming March in like a Lamb.
Thanks for stopping by!

Tuesday, February 22, 2011

February Table

My Valentines Day table underwent a metamorphosis while being created. It started out red and black and white, then went red and black and pink and then changed again to red and pink and white. In the end, I love it!I gathered many red accents from around the house and the Valentines storage bin.
Lit a few candles!

Added some pink candies... if you haven't tried Strawberry Whoppers, you're missing out. BUT. Do not set a tablescape with Whoppers in a south facing window or they'll look like this on your first mid-winter sunny day.

Red silky napkins tied with hearts that are meant to hang but made for cute little "napkin rings".

Some hearts and a few cinnamony heart candies... which are excellent in a wintry south facing window, if you like gooey chewy jellied candy. MMMMM!

Those yellow looking candles really are RED.

I love the look of the cream on pink on red plates. None belong with the other but don't they look great together?


A little shabby chic box filled with handmade hearts was a perfect accent!
The pretty red round placemat took the place of a charger this time and I love it! Bought after Christmas for 75 cents each.


This table didn't have as many candles as I usually like but the little lamp with it's red shade gives a romantic feeling to the table without.

This table calls for a little romantic evening! Don't you think?

January Table

Since I got my lovely table last year, I've anticipated my January tablescape. I couldn't wait! I'd had ideas of white and snow and silver-looking pretties everywhere for months. I could hard wait to take the photos. And then. It was done. And I didn't like it. Not at all. Ironically, several friends came in and said that it was their favorite yet. For me, not so much. I needed a string of lights with white wires. I only had green wired lights. So, after Christmas, I was shopping with Doug and, being that what he does for a living involves LEDs, he thought that we should only buy LED. To Doug, fine, if we're talking about car headlights, but for my tablescapes, never again. I didn't care for the blue tint of the lighting on the LEDs. I much prefer the softer, gentle looking lighting from the old-fashioned traditional Christmas lights. Enough said about that.

But, I did love using the silver chargers and white plates and white napkins and rings. White on white on white. You have to love that!

Liza bought me the little lantern, Carol bought me the snowflake cake pedestal, Denise bought the snowflake tin candle holder. So, the table was filled with goodies from my favorite people! What's not to love about that?

The little garlands and snowballs and snowflakes in silver and clear glass were also things that I absolutely love!

My cute little Arby's (of all places) goblets from the 80s are still some of my favorite things to use during the winter months. They're lovable too!
In looking at it, it will never be my favorite, but, I do love this table.
EXCEPT for those darn lights!

December table

My December tablescape was, by far, most most favorite yet! So much that I took photos of and spent every night looking at it and didn't realize that I'd not posted it on the blog! OH NO! I loved it so much that, for the first time in our lives, we didn't put the Christmas tree in the front window, but in the corner, so that the table could remain at home in the bay. It was simple, a bit rustic, a bit elegant, just the way I like them!The idea for this table was to make it elegant and yet keep it a bit primitive. I think I accomplished the goal.
It's only during the winter that I can use my Johnson Brothers Friendly Village dishes. So, I was thrilled to have them out every day in December! My first set of 8 was a gift from my favorite Uncle Bobby when I graduated from High School. My next set of 8 were inherited when Uncle Bobby passed away. He'd bought mine to match his all those years before. They are truly one of my most precious worldly possessions!


Believe is our "theme" for Christmas each year. I pulled the torchaire lamp in my living room from the corner and made it a part of the tablescape this year. Since the tree wasn't in the front window, we needed that extra holiday lighting and it did the trick!


Mom had a set of 12 little red dessert dishes that I also inherited last summer. I couldn't wait for Christmas to use them! And that red bell... I bought it from AVON with babysitting money when I was a teen. (It's sitting on top of a light, so that it really pops.)


After putting a few different candlesticks on the table, ironically, Go-Go, our puppy pulled a fur garland from the Christmas bins into the room to play. I cut it into pieces and wrapped the candlesticks for a little extra. I think that, besides the lights, it was my favorite thing on the table.

The lights! WOW! I purchased a new box of fifty white lights ($2) and left them semi-coiled, the way that they come out of the box, then placed this holly garland over them. Honestly, I think I spent more time looking at the table than I did the tree! I love lights anywhere, but on the table, this was the best!


I love this antique table. It gives me a perfect place to tablescape but I love the roughness of the wood that keeps things old and the tableware makes the statement that it's new. It's warm and inviting and welcoming. It's truly my favorite thing in my home!


Merry Christmas! (or memories as it may be!)


Tuesday, February 15, 2011

Talapia Scampi

I'm not at all a fish fan, but as mentioned before, Tilapia is so mild, I don't mind it at all. I try some new way of preparing it everytime since my family does love it. Last night, I found this recipe for a Scampi sauce to bake the tilapia in. OH MY GOSH, it was so good that I had a second piece. Try it! I didn't bake it nearly as long as the recipe called for, so check to see if it's flakey at about 20 minutes.

3/4 cup butter
1 1/2 teaspoons lemon juice
1 1/2 tbsp. minced garlic
4 (6 ounce) tilapia fillets, rinsed and patted dry
1 tablespoon dried parsley
Preheat oven to 375 degrees. Place a sheet of parchment paper in the pan or spray a cooking oil. Combine the butter, lemon juice, and garlic in a microwave-safe bowl; heat in microwave in 10-second increments until the butter is completely melted and the garlic has softened, stirring each time for about a minute.

Arrange the tilapia in the bottom of the prepared baking dish; pour the butter mixture over the fillets assuring they are all evenly covered. Sprinkle the parsley over the tilapia.

Bake turning the fillets every 10 minutes with a large spatula, until the fish flakes easily with a fork, about 30-40 minutes. I kept part of the butter sauce to the side to serve over baked potatoes. Enjoy!

Wednesday, January 12, 2011

Easy Stroganoff Casserole

It was one of those nights... it was dinner time before I had time to think about dinner. When I looked inside, I discovered a fridge full of nothing. And so, this little meal came to pass. I had no sour cream, but I did have an unopened Ranch Dip that needed to be used. I had no sliced beef, but I did have a freezer bag of cooked ground beef. Why not? I had no cream but I did have cream of mushroom soup. By the time the noodles were boiled, the table was set and dinner was ready to serve. We ate every bite and the kids asked if we could have it for dinner again tomorrow. I think it was it hit! Is this how lasagna was discovered?

1 pound hamburger, browned with garlic and onion to taste
1 16 oz. carton of Ranch flavored Dip (I'm sure that sour cream with a package of ranch dip would do the same trick.)
1/2 cup ketchup
1 can cream of mushroom soup
3/4 of the soup can of milk
1 small bag of petite frozen peas
lots of salt and pepper
about 4 cups of homemade style egg noodles
1 large pot of boiling salted water
Mix all of the ingredients in a large saucepan or fry pan. Heat until bubbly. Add the peas last. Cook the egg noodles in the pot of boiling water, drain well. Pour the sauce over and mix with the noodles. Enjoy!

Friday, December 3, 2010

Darcy's Peanut Butter Balls

Today's bit of love comes in the form of a recipe of the most favorite treat at last night's ward party. Darcy was kind enough to run home and get me the recipe for my blog today. I walked around the entire building with a few on a plate, asking, "Did you make these?" And the most frequent answer was, "No, but I want to know who did!" So here's Darcy's very nummy and simple treat.

1/4 cup melted butter or margerine
1 cup peanut butter
1 1/2 cups powdered sugar
2 cups Rice Krispies
1 tsp. vanilla

Mix all together and make into balls. Chill, then dip each ball into melted chocolate or melted chocolate chips. They freeze well.

However, last night, Darcy had made spread them onto a cookie sheet then frosted them with the melted chocolate. Then, she drizzled or used a frosting tube of white frosting over the chocolate. They were very thin (about as thick as an oreo, maybe) and the little tiny white swirls all over them looked so festive. She'd cut them into about 1 1/2 " squares and had them on a platter. They looked so dang cute and delicate! I wish I'd taken a picture. Seriously, the hit treat of the evening! I'll make them and photograph them asap! Enjoy!

Monday, November 29, 2010

Butter Sauce for Salmon

This is an old favorite in our home and I usually prepare the sauce to go on baked salmon. Doug bakes the salmon, so don't ask how to do that. ;) I'm not a fan of salmon but with this sauce, it's awesome!
1/2 pound butter
2Tbsp. Kikoman Soy Sauce
4 tsp. lemon juice
pepper to taste (the more the better, in our house)
1 Tbsp. chopped parsley
4 chopped green onions (from the root almost to the end of the stem)
Melt the butter and add the remaining ingredients. Keep warm and pour over baked salmon. I usually serve this sauce with baked potatoes or rice. It's fabulous! Enjoy!

Sunday, November 28, 2010

Thanksgiving for the Kids!

Thanksgiving is always such a fun time for cousins to get together and enjoy eachother's company. This year, we had ten children, ages 2 to 15 and I wanted to create a fun but beautiful table for them too! I set up a banquet table and went for it!
I've never used paper plates until a few weeks ago for the Seniors Dinner and since I had some leftover, and had so many people coming for dinner, I thought I'd try it again. The grown-ups got the left over Senior's plates and the kids got more of a youthful themed table. I bought this brown and red plaid paper plates at Target in their Christmas section last week. They were perfect for a Thanksgiving table and were made just to go along with my table favors, the paper cup turkeys filled with what else, but red and brown Tootsie Rolls!
I made these darling little turkeys from brown paper cups (purchased at Hobby Lobby) and used my cricut to cut the leaves/feathers out for the tail. I got the idea from friend, Marilyn, who did not use wiggly eyes. Friend Connie and I trade favors all the time and I'd agreed to make her some too. She picked up the eyes and came home with wiggly eyes. I thought they were perfect! I made nineteen cups in less than an hour, start to finish!
One thing that I didn't have on the table when I took the photos was the tags. I used Staples 1 1/4" circle tags with the metal rings on them. Then, stamped a fall leaf, chalked it, wrote each child's name on their tag and tied it to the handle of the cocoa mugs. The kids thought that it was pretty special!
Seriously, Thanksgiving dinner served on paperplates and chargers was the ticket for this many guests! I didn't have to hand wash the fragile china and clean up was a breeze! With all the beautiful paper goods out there, I may be doing this more often!
A friend commented, "Why do you go to all that trouble when it's over in 30 minutes and no one will remember anyway?" I beg to differ. My kids love to talk about the cool tables that they get to eat at. This will be the "Tootsie Roll Turkey Thanksgiving" for them. Worth every minute of preparation, indeed!


Thanksgiving Dinner Table

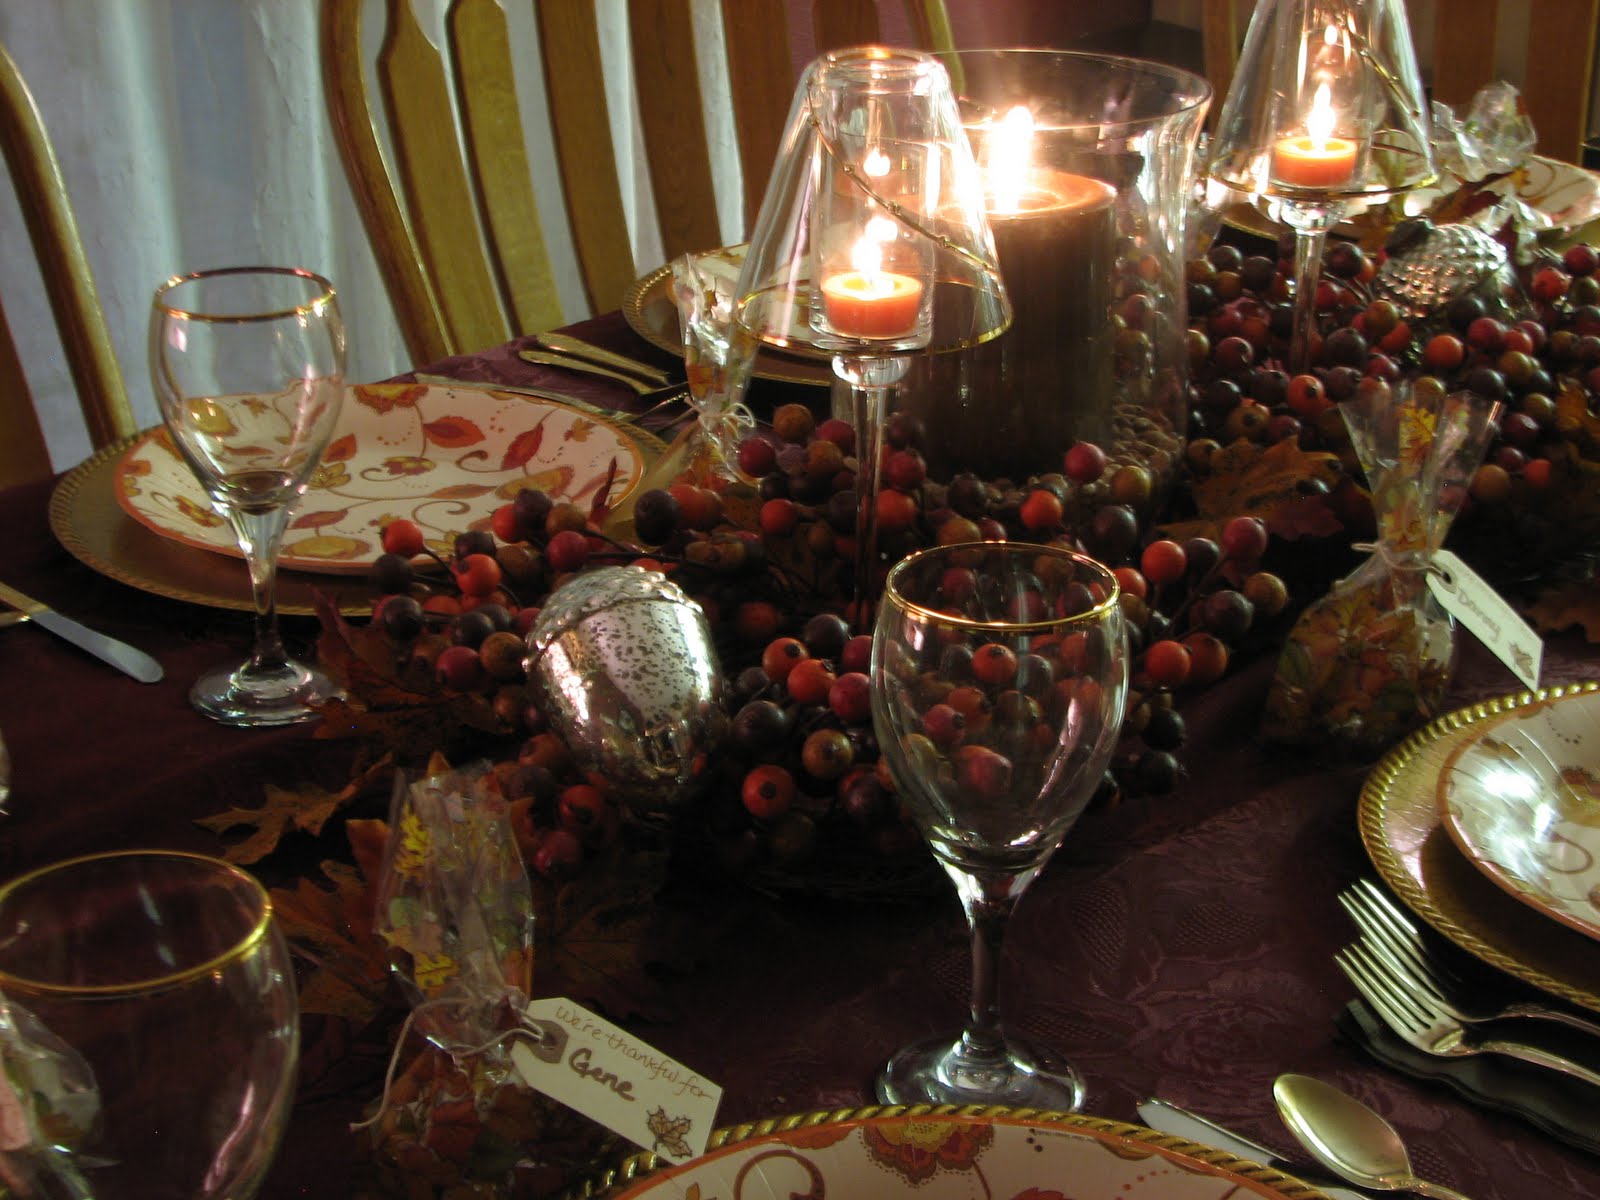
When I suddenly had everyone we'd invited to Thanksgiving dinner accept, I decided to use chargers and paper plates. I'm loving it! These were leftover plates from the dinner I'd served two weeks ago to the senior widows in our LDS ward. But, I couldn't create the same tablescape twice, so here was table number two with the same dishes...paperplates from Hobby Lobby.

I used a wine colored tablecloth and when it all came together, I was not loving it, until I remembered these beautiful berry wreathes hanging on the backs of the chairs that go with my antique tablescaping table. Perfection! They brought all of the wines and oranges and golds together.


Friend Connie and I trade favors all the time. I'd made her Thanksgiving stuffing and Tootsie Roll Turkey cups (see Kids Thanksgiving table). Connie made hand-dipped chocolates and caramels, in trade. I think that I got the better end of this deal, for sure!
The leaf garland down the center pulled the fact that I was using two wreathes together. The candles in the center of each wreathe were purchased at Pier One in January a few years ago for $1.50 each when they were 90% off! They've been so versatile! Wait till I share what I'm doing with them for Christmas this year!
The little tags, just paper tags from Staples, were stamped with a little fall leaf and then chalked in to match the berries. (I did them while watching the weather. Literally ten minutes.)
Then, I wrote "We're thankful for" and filled in the names with a Zig Marker. A table favor and name card all in one!
The table was simple, yet elegant! We served Thanksgiving dinner buffet-style. So, the table remained lovely all afternoon! Gathered together with family, we had much to be thankful for!

Wednesday, November 24, 2010

Thanksgiving Stuffing

This is one recipe that I've never recorded before because I've never really measured what goes in it. This morning, I took note of what I was using. It makes a TON of stuffing, but I use it for a casserole with leftover turkey. Besides that, stuffing is one of the best things to snitch a piece of all weekend, right? Especially with cranberry salad for a snack! This recipe could be cut in half or thirds, but here's what I make each Thanksgiving, whether we are having 30 people or 2. It does freeze well, but we never have any left after a few days. It's not diet stuffing!


3 - 12oz. bags of Pepperidge Farms Herb Flavored Stuffing croutons or crumbs
1 large bunch of celery
2 large onions
2 cans sliced mushrooms or 1 large package of fresh mushrooms
1 pound of butter (told ya!)
6 eggs
about 6- 8 cups water
1 Tbsp. poultry seasoning
2 regular size cans of chicken broth
salt and pepper

Finely chop the celery, onions and mushrooms. Saute the veggies in 2 sticks of butter until cooked well. In a very large bowl (the large FixNMix Tupperware bowl), pour the sauteed veggies over the bread crumbs and cubes. In a separate large mixing bowl, mix the eggs, poultry seasoning and water and also two more sticks of melted butter. Pour over the bread. Also pour the chicken broth over the bread and veggies. Mix well. Add more water, if desired, to get the bread mixture to the desired moistness and texture. We like it very moist. Pour and spread into three large baking sheets. (I use the Pampered Chef deep baking sheets.) Cover tightly with foil. Bake at 350 degrees for about 30 minutes, until cooked through.

I usually make this stuffing the day before Thanksgiving. Keep it sealed tightly with the foil and reheat. before serving. Cut into squares or scoop into a bowl after reheating to serve. Enjoy!